Make the Office Ribbon that suits you and your job!
Microsoft Office products all support a standard ribbon menu with pretty much the same functionality with the exception of product specific tasks that differentiate them (ie: Word for documents and Excel for spreadsheets). Although we are all using the same Microsoft Office products we don't all use them the same way. Many of us do very specific job tasks that require us to use the product in a certain way. And Microsoft allows us to customize the ribbon to help us work more efficiently. We can even create new ribbon items that do specific functions.
The Microsoft Office Ribbon is made up of some core components:
- Quick Access Toolbar for shortcuts to functions
- Ribbon Tabs to access different function groups
- Command Groups within a Tab to provide access to commands or options
- Commands to provide a given function
- The Backstage which is Microsoft's term for the File Menu which allows us to configure the Office product in general such as the Ribbon

Customize the Quick Access Toolbar
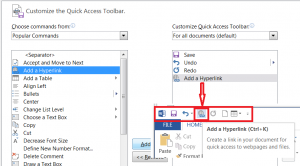
Lets start with the QAT menu. Click on the QAT drop down arrow. You will see a Microsoft Office predefined set of command functions. Then select More Commands.

The More Commands option will bring up the QAT options menu that will allow you to add additional command functions. Select the Add A Hyperlink function on the left and click the Add button and then click OK. You will now see the Hyperlink icon within the QAT menu area.
Once you have accomplished the above return to the QAT / More Commands and try to locate some command functions that will help you be more efficient in your work and add them to the QAT for future use.
Customizing the Ribbon
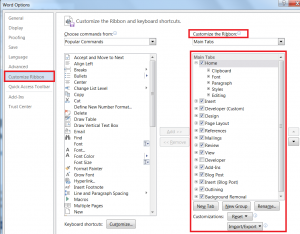
When you first start Microsoft Office 2010, 2013 or 2016 you'll be presented with the start page, which is Backstage view. Here you can start a new document using a pre-created template (including the Blank template, or open an existing file. By default you'll see your most recently used files listed on the panel to the left. To customize the Microsoft Office Ribbon you will navigate to the Office product Backstage by click on the File menu Tab in the top left of the Office product you are using. This will bring up a window with a number of configuration options that apply specifically to the Office product as a whole as opposed to the single document you may currently be working on. From the Backstage menu click on Options. Then select Customize Ribbon. (you will notice you can also come to this Options section and configure the QAT as well)
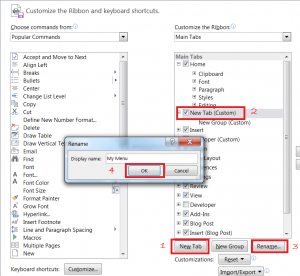
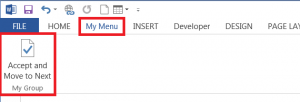
Now you will add your very own Ribbon Tab
Click on New Tab button, then click on the New Tab item just created and then click on the Rename button and name it My Menu.
Select the New Group item below My Menu Tab and rename it to My Group. Now select a Command from the left hand selection pane and click the Add button. Then click OK.
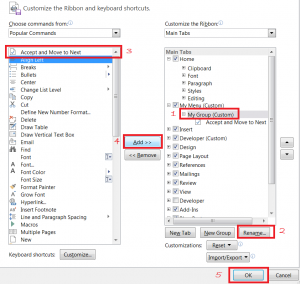
You should now see your new My Menu Tab in the Office product Ribbon at the top of the screen.
Now that you know the process return to the File / Options window and start adding more command functions to your My Menu command group that you believe will assist you in your work. Over time add more functions to your menu Tab and eventually you will find that you don't have to wander around the Office Product Ribbon looking behind each Tab to find the commands you are looking for and use the most!
Next article we will add a new command to the Ribbon based on a simply recorded Macro that anyone can do!