Article Highlights
- Microsoft Aspire turns distributed application configuration into ordinary C# code, replacing scattered ARM and Bicep files with a single AppHost project under source control.
- Extension methods like WithReference, WaitFor, and WithHttpHealthCheck wire web services, frontends, and databases together with minimal ceremony.
- Aspire supports SQL Server, Azure SQL, MySQL, and other resources locally through Docker containers or in the cloud through Azure App Service environments.
- A built-in dashboard provides health checks, logs, and a graph view of your resources, while Managed Identities and emulators handle security and local-versus-production switching.

Here's everything you need to start using Aspire to reduce the complexity of creating distributed .NET applications.
Creating a distributed application is not trivial. And if you decide to create your distributed application in Azure, you add even more complexity (and I have the evidence to prove it: I've been writing a series on creating an Azure cloud native application that's already up to 23 posts and has, at least, four more to go).
Imagine, for example, that you want to create this application to run either locally on your servers or in the cloud (or some combination of both):
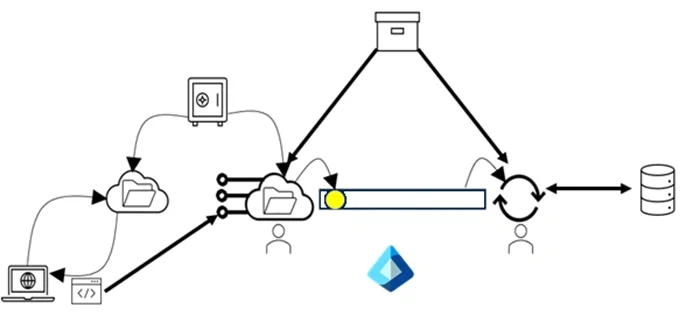
- The user downloads a JavaScript app from a web site
- The JavaScript app calls a web service
- Both the web site and web service need to have configuration information
- Those configuration files redirect to some secure source that holds secrets that shouldn't be kept in a configuration file
- The web service writes to a queue (or raises an event)
- A backend application reads from that queue (or subscribes to that event) and updates a database
- Configuration information that's shared among multiple resources (e.g. the name of the queue) is kept in some common location that applications draw on
- Access to the web service and the backend application are handled through some permission granting system (like Entra ID)
And if that isn't enough: in addition to defining and deploying the required resources, you will also (of course) need multiple copies of those resources for, at the very least, development and production.
But you're not done yet. Once you move your app to production, you'll need to monitor those resources to ensure that they are, in fact, all running and working together — so you'll need to set up health probes, alerts, and some activity monitoring system.
Quite frankly, it's a miracle that you can ever make it work.
Introducing Aspire
Aspire is intended to reduce the complexity in creating and integrating these tools by leveraging what developers do best: writing code. Aspire is equally comfortable creating all your application's resources to run your application locally on your development computer, on your organization's servers, or in the cloud.
Aspire takes the concept of "infrastructure as code" seriously, by turning all your configuration and infrastructure management into "just another C# project" in your solution (or in the .NET language of your choice). With Aspire, your resources are all just code in your IDE (Visual Studio or Visual Studio Code) and source control: you can pull and merge changes, release new versions, and review your version history, just like the rest of your code.
Finally, as icing on the cake, Aspire automatically includes the tools you need to monitor your application from a central dashboard. If you're new to .NET programming or want to refresh your foundations, the language and runtime fundamentals make working with Aspire much smoother.
The best way for me to show how Aspire works is to walk through a demonstration. I'll start off by using Aspire to build a local application and then move on to using Aspire to create a cloud-native application in Azure.
Getting Started
Before using Aspire on your development computer, you must:
- Install .NET 8 or later (I tested with both .NET 9 and .NET 10)
- Install Docker Desktop for Windows
- From a command window, install the Aspire workload with the command:
dotnet workload install aspire
You can also, if you wish, install the Aspire CLI using either Bash or PowerShell.
PowerShell: irm https://aspire.dev/install.ps1 | iex
Bash: curl -sSL https://aspire.dev/install.sh | bash
You'll also need to download the current Aspire templates using this command (still in the command window): dotnet new install aspire-templates.
Because Aspire leans heavily on container orchestration, knowing your way around Docker pays dividends as soon as you press F5 for the first time.
Using Visual Studio
If you're using Visual Studio, make sure that you're working with the latest version (I used Microsoft Visual Studio Professional 2022, version 17.14.16 when I was working in .NET 9 and Visual Studio 2026 Insiders version 111513.90 for .NET 10).
Creating your first project is easy in Visual Studio: start Visual Studio and pick one of the Aspire project templates and work through the usual New Project wizard. I'd suggest starting with the Aspire Starter App (ASP.NET Core/Blazor) template.
Using Visual Studio Code
Creating a new Aspire project in Visual Studio Code (VSC) is only slightly more complicated. First, you need to install both the C# Dev and Aspire extensions. Once they're installed:
- From VSC's command palette (Ctrl + Shift + P), select New Aspire Project and answer the various prompts at the top of the VSC window.
- Your first option will be to pick the template you want to use. I'd recommend the Aspire Starter App (ASP.NET Core/Blazor).
- To set up your project for testing, return to the command palette and select Configure launch.json file.
Using the Aspire CLI
You can use the Aspire CLI to create your project by opening a command window and using:
aspire new aspire-starter --name <name of your application>
After that command finishes running, you can open the project with the editor of your choice.
For the rest of this blog, I'm going to focus on Visual Studio because its UI simplifies working with Aspire.
Configuring an Aspire Solution
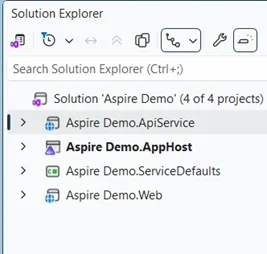
The solution you'll start with will vary, of course, depending on which project template you picked (and which version of the template is current). In Visual Studio, with the Starter Template, you currently get four projects:
- A Web API Service project
- A Service Defaults project that holds code for setting up monitoring and health checks
- A Web project that holds a Blazor application
- An AppHost project where Aspire lives (and what I'll focus on in this post)
That looks something like this in Visual Studio’s Solution Explorer (I cleverly called my solution “Aspire Demo”):
In this demo, I'm going to concentrate on the Aspire portion of this solution and the code to define your application's resources. That's all in the AppHost project and, specifically, in that project's AppHost.cs file. You will, of course, still need to fill up your projects with application code — Aspire doesn't replace that. If you'd like a deeper dive into the language itself, the Introduction to C# Language course is a great companion to this material.
Think of the AppHost.cs file as an equivalent to your regular project's Program.cs file, except that the code in your AppHost.cs file functions at the solution level rather than the project level. While an application's Program.cs contains the code to configure your project, your AppHost.cs file contains the code that configures the resources for your whole solution and makes those resources available to the projects in your solution (I'll just refer to the "AppHost.cs" file as your "AppHost file" from here on).
You can add or remove any of the other projects in the solution. For example, the Starter template creates a Blazor project but you could delete that project and replace it with an MVC, Razor, React, Angular, or plain-old JavaScript project if you want. On the other hand, rather than deleting the default Web API project, you might want to add more Web API projects because you'd like to divide your APIs up by function (e.g. you might want separate Orders, Customers, and Inventory web services).
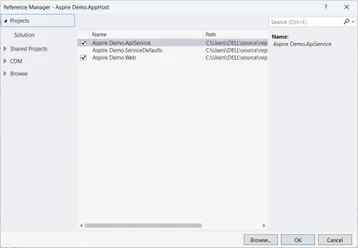
When you do add another project to your solution, you’ll need to do add a reference in your AppHost file to integrate your new project into your Aspire solution. Your first step is to add a reference to your new project to your AppHost project’s Project References list. Here’s the list created by the Starter Template, for example:
You’ll also need to add some code to your AppHost file (see below).
Aspire at Work: Configuring Your Resources
The first step in configuring your app is to create, in your AppHost project's AppHost file, a DistributedApplicationBuilder object. This looks very much like the first line in the Program.cs file of an ASP.NET application (much of this following code comes, by default, with the Starter template):
var builder = DistributedApplication.CreateBuilder(args);
Adding a Web Service
Next, you need to add references to the projects that make up your solution by calling your builder object's AddProject method — this is where you'd add any new projects you include in your solution.
There are multiple overloads for the AddProject method but the easiest one to use is the generic version that allows you to use a data type assigned to your other projects through the AppHost project's Projects collection (that collection is automatically built for your solution from the AppHost project's Project References list).
When you call the AddProject method, you pass the method a string that will be used in your solution's dashboard to identify the project. The method returns a reference to the project you've added that you can use to tie together the components of your solution.
Putting it all together, the first configuration call in my AppHost file is to add my Web API project. That code looks like this (this example shows the default name assigned by the Starter template for the Web API project):
var apiService = builder.AddProject<Projects.Aspire_Demo_ApiService>("myapi");
If you remove a project from your solution then you'll need to delete its AddProject call in your AppHost file.
Now that you have a reference to your Web API service project, you can use that to configure your service. For example, you can add a health check to your service. The default health checks are defined in your ServiceDefaults project's Extensions.cs file. A quick look in that Extensions.cs file shows this statement defining a HealthEndpointPath variable right at the top:
private const string HealthEndpointPath = "/health";
Back in your AppHost file, you can use that HealthEndpointPath with your Web API service to add monitoring to your service. You do that by calling the WithHttpHealthCheck extension method on your project reference and passing the endpoint from your Extensions.cs file.
In my AppHost file, I add the health check to my Web API service like this:
var apiService = builder.AddProject<Projects.Aspire_Demo_ApiService>("myapi").WithHttpHealthCheck("/health");
You're going to see this pattern a lot in this guide — in Aspire, extension methods are the mechanism you use to configure your resources.
If you want, you can configure your health check settings in the various methods in the Extensions.cs file in the Service Defaults project, but the default settings are probably fine for your first project.
As you'll see, the steps you saw here are the general pattern for defining resources with Aspire:
- Add the NuGet package with the objects you need.
- Create the resource, configuring it with a combination of extension methods and lambda expressions.
- Tie the resource to other resource(s) in your Aspire code.
Adding a Frontend
Similar code lets me integrate my Web project into Aspire. My Web project is called "Aspire_Demo_Web" by default and I'm going to give it the label "WebFrontEnd" in my dashboard:
var frontend = builder.AddProject<Projects.Aspire_Demo_Web>("WebFrontEnd");
By default, my projects can only be called by other projects in the same solution. Since I want my web frontend to be available over the internet, I want to override that default. To do that, I call my web project's WithExternalHttpEndpoints extension method to configure public access. And, as long as I'm doing that, I'll also add a health check to my web project:
var frontend = builder.AddProject<Projects.Aspire_Demo_Web>("WebFrontEnd").WithExternalHttpEndpoints().WithHttpHealthCheck("/health");
I'm not quite done with configuring my frontend, though, because I also want to tie my web frontend into my Web API service. I do that by calling my frontend's WithReference method, passing the reference returned when I created my Web API service. I can't, of course, tie my frontend to my Web API service until the service is ready, so I also call my frontend's WaitFor method, passing the reference to my Web API service:
frontend.WithReference(apiService).WaitFor(apiService);
Now that I've defined my frontend, my backend, and tied them together, I can run my (admittedly minimal) application. To support that, as with a Program.cs file, my AppHost file needs to end with a run command that looks like this:
builder.Build().Run();
Now, when I press F5, my AppHost project and Aspire will work together to create containers for my applications, load my applications into those containers, and (thanks to the references I've passed) create all the necessary connections between those containers that allow my web frontend to call my Web API backend.
Adding a Database
Of course, for any business application, I'm going to need a database.
Adding SQL Server
To incorporate a new Microsoft SQL Server database instance, I first add the Aspire.Hosting.SqlServer NuGet package to my project and then use the AddSqlServer method in my AppHost file to add a SQL Server database server to my solution. I also use the WithDataVolume and AddDatabase methods to both create a database within that server and get a reference that I'll use in configuring my solution:
var salesdb = builder.AddSqlServer("sqldata").WithDataVolume().AddDatabase("salesDB");
If, rather than creating a new database server instance, I wanted to add a reference to an existing database server, I would use the AddConnectionString method rather than the AddSqlServer method. The AddConnectionString method expects to be passed the name of a connection string in my AppHost project's appsettings.json file, like this:
var salesDb = builder.AddConnectionString("salesdbconn");
The corresponding entry in the appsettings.json file would look like this:
{
  "ConnectionStrings": {
    "salesdbconn": "Server=...<connection string>..."
  }
}
Adding Azure SQL
If you wanted to add an Azure SQL database to your application, the code isn't much different. You will need to add the Aspire.Hosting NuGet package to your application and then call the builder object's AddAzureSqlServer method.
This example creates an Azure SQL Database instance and then adds a database called SalesDB to it:
var sql = builder.AddAzureSqlServer("azureSQL");
var salesdb = sql.WithDataVolume().AddDatabase("salesDB");
Regardless of how your database is created, you can now tie the database to your Web service using the database reference you just created. That requires two methods that you've seen before:
- WaitFor method to tell the service to wait for the database to become available
- WithReference method, passing a reference to the database, to tie the service running in its container to the database running in its container
For my Web service, its configuration code would now look something like this:
var apiService = builder.AddProject<Projects.Aspire_Demo_ApiService>("myapi").WithHttpHealthCheck("/health").WaitFor(salesdb).WithReference(salesdb);
Aspire doesn't update my application code so, inside the Web API service's code, I still need to do the usual things:
- Add the Aspire.Microsoft.Data.SqlClient NuGet package to the Web API service project
- Include the code to integrate with my database
If I was working with Entity Framework, I'd need to use code like this, passing the name of the connection string in my Web service's appsettings.json file:
builder.AddSqlServerDbContext<MyDbContext>("sqldata");
I'd use code like this if I was going to use the SqlClient object directly:
builder.AddSqlServerClient("sqldata");
Other Databases
If you don't want to use Microsoft SQL Server, Aspire includes extension methods for other databases. If, for example, you wanted to use MySQL as your database server, you'd add the Aspire.MySqlConnector NuGet package to your AppHost project and add code like this to your AppHost file:
var mysql = builder.AddMySql("mysql").WithLifetime(ContainerLifetime.Persistent);
Testing and Monitoring Your Local App: The Aspire Dashboard
To test your application:
- In Visual Studio, just press the F5 key.
- In Visual Studio Code, from the View menu select Run, choose your Aspire launch configuration from the dropdown, and click the green Start Debugging button.
That will run your application on your development computer by loading your projects into containers and loading those containers into Docker. The Aspire dashboard will appear, giving you the health status of your application's resources (and if, when your dashboard appears, you get the message that your containers are "unhealthy," it probably means that you need to start Docker from your Windows Start menu).
For my sample application, my dashboard looks like this:
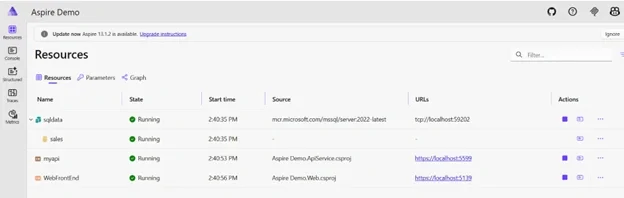
To interact with either my web frontend or my web service, I just need to click on their links in the URLs column in the dashboard. Alternatively, I can view the health status of any of my resources by clicking on the row for the resource.
Here’s the status for my database:
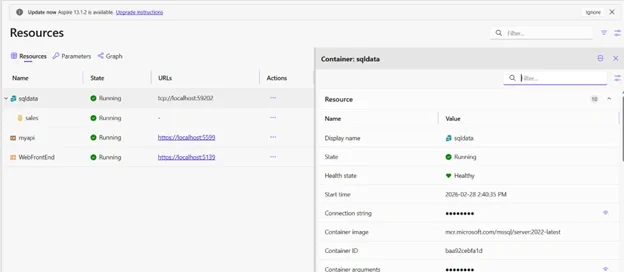
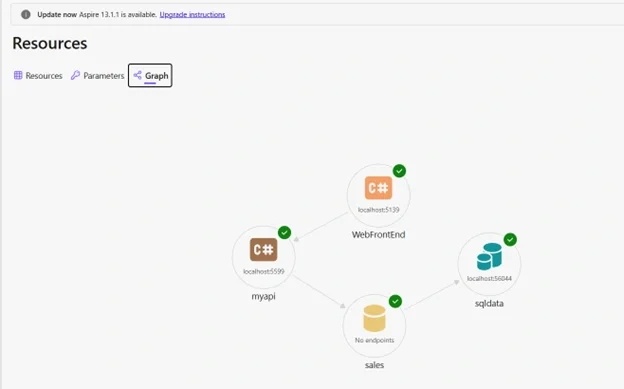
While the dashboard's default view on the tab called "Resources" provides a lot of information (including access to the log files for each of the resources), you might prefer the more visual view on the Graph tab:
Moving to the Cloud
You can also use Aspire to create cloud resources (or access existing resources) and integrate those resources into your solution. If you're new to Microsoft's cloud platform, the Microsoft Azure training catalog covers everything from fundamentals through advanced architecture.
Supporting the Cloud
To support moving to the cloud, you'll need to add the Aspire.Hosting.Azure.AppService NuGet package to your application (as I write this, the Aspire.Hosting.Azure.AppService package is in preview so you'll need to use the prerelease option to add it).
You then need to create a cloud environment for your application using the builder object's AddAzureAppServiceEnvironment method (a badly named method because it doesn't create an App Service but, instead, creates an App Service plan to manage your Aspire environment in the cloud):
var appServiceEnv = builder.AddAzureAppServiceEnvironment("envAspireDemo");
If you wanted to use an existing service plan to define your environment, you'd use code like this to reference an existing service plan and resource group:
var appServiceEnv = builder.AddAzureAppServiceEnvironment("appService").AsExisting("myServicePlan", "myAppResourceGroup");
Leveraging Aspire Parameters
The names of your plan will almost certainly change from development to test to production which means those names are good candidates to be managed in your AppHost project's appsettings.json file. To tie values in your program to configuration settings, you can use the builder object's AddParameter method to create Aspire parameters, passing the path in your appsettings.json file that leads to the values your parameters will use.
Typical code that retrieves the plan name and resource group name from the project's appsettings.json file and then uses them to define your Azure environment might look like this:
var plan = builder.AddParameter("resourcesetting:planName");
var resourceGroup = builder.AddParameter("resourceSetting:groupName");
var appServiceEnv = builder.AddAzureAppServiceEnvironment("appEnvironment").AsExisting(plan, resourceGroup);
Adding Resources to the Environment
With your Aspire environment defined, you can load your Web API service into it using the service's PublishAsAzureAppServiceWebsite method (the method must be passed a lambda expression that you would use to configure the application in the service, even if you don't provide any configuration information). Currently, to deploy to Azure, all your projects must also call the WithExternalHttpEndpoints method.
Implementing that means that the code that configures my Web API service now looks like this (I've highlighted the new addition):
var apiService = builder.AddProject<Projects.Aspire_Demo_ApiService>("apiservice")
  .WaitFor(appservice)
  .WithHttpHealthCheck("/health")
  .WaitFor(salesdb)
  .WithReference(salesdb)
  .WithExternalHttpEndpoints()
  .PublishAsAzureAppServiceWebsite( (website, slot) => { });
Supporting Local Testing
You have a couple of options when switching between your application's resources when testing on your local computer and when running in the cloud. Many Azure resources have containerized emulators that you can use during testing — just call the RunAsEmulator extension method on the resource and Aspire will take care of switching between the emulator during testing and the real thing in the cloud.
For resources that don't support the RunAsEmulator method, you can use other emulators and leverage the builder.Environment.IsDevelopment() method to switch between them. For Azure Storage, for example, you can use the Azurite storage emulator for testing; for Azure SQL, you can use Microsoft SQL Server.
Securing with Managed Identities
In any real app, you'll need to secure access to your application's resources to ensure that, for example, only your Web API service can access your database. For an Azure resource, your best choice is to use a user-assigned Managed Identity.
For a Managed Identity, you need to first add the Aspire.Hosting.Azure NuGet package. Once you have that in place, you can create an identity using the AddAzureUserAssignedIdentity method from your builder object:
var dbIdentity = builder.AddAzureUserAssignedIdentity("AccessDB");
Now that you have the identity, you can give it permissions — which will be the responsibility of your database's DBA. Essentially, your DBA has to create an external user tied to your managed identity and give that user permissions to tables in the database.
Which raises a couple of issues. First, to create and assign a Managed Identity, you must have the Managed Identity Contributor role in Entra ID...and you probably don't. As a result, you'll need some administrator to define the Managed Identity for you. In addition, your database's DBA won't be able to assign your Managed Identity permissions until after the identity has been created (and you are probably not your database's DBA, anyway).
That means that there will be a separate "security oriented" process that will create your Managed Identity and assign that identity the permissions it needs (some of which can still be done in Aspire — just in a separate project to be run by someone or some process that has Entra ID permissions). In your Aspire code, you'll just need to acquire the identity that has been created for you by your security team.
To access an existing Managed Identity, you use the builder object's AddAzureUserAssignedIdentity method and PublishAsExisting method, passing the name of the identity and resource group the identity belongs to:
var dbIdentity = builder.AddAzureUserAssignedIdentity("dbIdentityLabel").PublishAsExisting("dbAccess", "AspireDemoRG");
This may be another place where you'll want to use Aspire parameters and the IsDevelopment method as you move from development to production.
With your identity created, your final step is to assign the identity to your service. You do that with your service's WithAzureUserAssignedIdentity method, passing your Managed Identity. That means that your fully configured Web API service would look something like this:
var apiService = builder.AddProject<Projects.Aspire_Demo_ApiService>("apiservice")
  .WithHttpHealthCheck("/health")
  .WaitFor(salesdb)
  .WithReference(salesdb)
  .PublishAsAzureAppServiceWebsite( (website, slot) => { })
  .WithAzureUserAssignedIdentity(dbIdentity);
If I wanted to be able to turn using my identity off and on between development and testing, I could break that up into two steps:
var apiService = builder.AddProject<Projects.Aspire_Demo_ApiService>("apiservice")
  .WithHttpHealthCheck("/health")
  .WaitFor(salesdb)
  .WithReference(salesdb);

if ( builder.Environment.IsDevelopment() ) {
  apiService.PublishAsAzureAppServiceWebsite( (website, slot) => { })
    .WithAzureUserAssignedIdentity(dbIdentity);
}
Deploying Your Application
To deploy your application to production locally, you can handle it like any other containerized application. The process is different for deploying to Azure.
Configuring for Deployment to Azure
To deploy to Azure, you'll need to ensure that you've added the Aspire.Hosting.Azure.AppService NuGet package to your AppHost project (you will have done this as part of defining your Azure environment).
You'll also need to install Git for Windows on your computer (again, if you haven't already installed it). You can download Git for Windows from https://git-scm.com/install/windows.
You'll also need to install the Azure Developer CLI:
PowerShell: winget install microsoft.azd
Bash: curl -fsSL https://aka.ms/install-azd.sh | bash
If you install the Azure Developer CLI while Visual Studio is running, you'll need to restart Visual Studio.
Deploying
When you deploy to Azure, you'll need to specify the region that you'll deploy to — make sure to pick a region that supports Aspire. As I write this, I couldn't find a definitive list, but if you do a search on the region of your choice and add "is a region that supports Aspire deployment" you'll probably get back a useful answer (I used Canada East).
To deploy to Azure from Visual Studio (after ensuring that you've logged into Azure from within Visual Studio):
- Rebuild your solution (publish to Azure does not do this automatically).
- Ensure that your AppHost project is the currently selected project in Solution Explorer.
- From the Build menu, select Publish Selection to display the Publish Profiles page.
- Click on the Add a Publish Profile link to open the Publish dialog box.
- Select the Azure Container Apps for Aspire option and click the Next button.
- In the Configure your AzDev Environment option, select your subscription, select an Azure region, and provide an Environment name (I used "Aspire-Demo").
- Click the Finish button to create your profile and deploy your application.
- Wait patiently (you might want to go and get a coffee).
- When notified that your environment is created, click the Close button to see your profile.
To deploy from Visual Studio Code:
- In the Terminal window, navigate to the folder for your AppHost project.
- Use the following commands:
azd init: to scan your app. If you created a new environment instead of linking to an existing App Service plan, you'll need to provide a name for it.azd auth login: to log into Azure.azd up: to deploy your application. You'll need to provide a subscription and an Azure region.
- Wait patiently for the process to complete (you might want to get a coffee).
The deployment process will finish by displaying the URLs for your deployed applications — try them out.
And now you've defined your resources and deployed them to Azure, all from a project running C# code. Instead of managing multiple ARM and Bicep files, you have to manage your AppHost.cs file.
One final point about that AppHost file: your Aspire code is not only effective (because it creates your solutions), it's also self-documenting. The Aspire code in your solution is an unambiguous description both of all the resources your solution needs and how they are related. And it's not only searchable (just use Ctrl+F), it's also IntelliSense-supported.
But, of course, now that you've defined and documented your resources, you still have to do what you were hired for: write some application code in your various projects for your Aspire code to deploy.
Recommended Learning Tree Training
To get the most out of Aspire, pair it with structured training across the .NET, cloud, and container disciplines it depends on:
Frequently Asked Questions (FAQs)
What is Microsoft Aspire and what problem does it solve?
Microsoft Aspire is a stack for building distributed .NET applications that treats infrastructure as ordinary C# code. Instead of juggling ARM templates, Bicep files, and ad hoc configuration, developers define every resource — web services, frontends, databases, queues, and Azure components — inside an AppHost project. Aspire then orchestrates those resources locally in containers or in the cloud, dramatically reducing the complexity of cloud-native development.
What do I need installed to start using Aspire?
You need .NET 8 or later (Aspire works with .NET 9 and .NET 10 as well), Docker Desktop for Windows, and the Aspire workload installed via dotnet workload install aspire. You should also install the current Aspire templates with dotnet new install aspire-templates. Optionally, you can install the Aspire CLI to scaffold projects directly from the command line.
How does Aspire connect a web frontend, web service, and database?
Inside the AppHost.cs file, you call AddProject for each project and AddSqlServer (or AddAzureSqlServer) for the database. Each call returns a reference you pass to other resources using WithReference and WaitFor extension methods. This wiring tells Aspire to start the database first, expose its connection string to dependent services, and create the network paths between containers automatically.
How do I deploy an Aspire application to Azure?
Add the Aspire.Hosting.Azure.AppService NuGet package, define an Azure App Service environment with AddAzureAppServiceEnvironment, and call PublishAsAzureAppServiceWebsite on each project. Install Git for Windows and the Azure Developer CLI (azd), then publish from Visual Studio's Publish dialog or run azd init, azd auth login, and azd up from the AppHost folder. Deployment finishes by displaying the URLs of your live Azure resources.