Greetings, fellow scripters!
Students and clients have asked me about creating simple menus many times over the past few years. "Is it possible to offer the script user a multiple-choice menu?" is the typical question. "Yes," is my typical answer.
Those of you in my generation remember the DOS era, during which such menus were prevalent. Those of you who entered the IT profession somewhat later may still have experienced some of Microsoft's own text-based menus, such as SCONFIG.EXE. These menus can be generic or elaborate, depending on your time and the importance of aesthetics involved.
In this entry, I'll walk you through the process, piece by piece, codeblock by codeblock, so that you can decide where your preferred stopping place lies. First, we'll look at how to use single keypresses to make simple choices. Then, we'll add some formatting to improve appearance and screen real estate usage. We'll even decorate the CLI, first a little, then more, and finally, a lot, to give you the text menu appearance, functionality, and professional flare you find most suitable to your needs.
Ready? Let's get started! Feel free to write your own code or copy and paste mine to test out our menu. We'll create it step by step, explaining as we go.
The Basics:
We all likely know about the Read-Host cmdlet. Its purpose is to pause the code, prompt for input, accept the input, and then proceed once the user presses ENTER. Customarily, we place the user's input into a variable to be used in our imminent code.
However, occasionally, if we only need to use the input once, we'll place the Read-Host line in parentheses where the variable would typically be used. Below are some examples to illustrate these concepts:
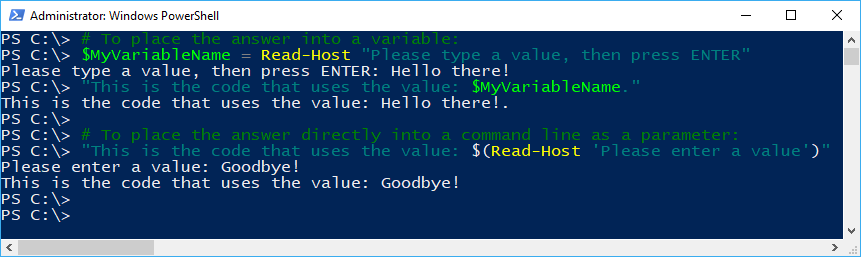
SAMPLE CODE:
# To place the answer into a variable:
$MyVariableName = Read-Host "Please type a value, then press ENTER."
"This is the code that uses the value: $MyVariableName."
# To place the answer directly into a command line as a parameter:
"This is the code that uses the value: $(Read-Host 'Please enter a value')"
# END
The problems with using Read-Host for choice-making arise when someone types something that is not a legitimate choice. For example, imagine expecting a number from 1 to 5 and receiving "Fred," or even 6 or 55. The result could crash your script or, worse yet, do the wrong thing.
To prevent this, we would have to do some coding to ensure that the value entered met our expectations, and if not, take evasive action or insist that the user input a valid choice. Indeed, this can be done. Here's one possibility for handling such an issue with RegEx:
SAMPLE CODE:
#>
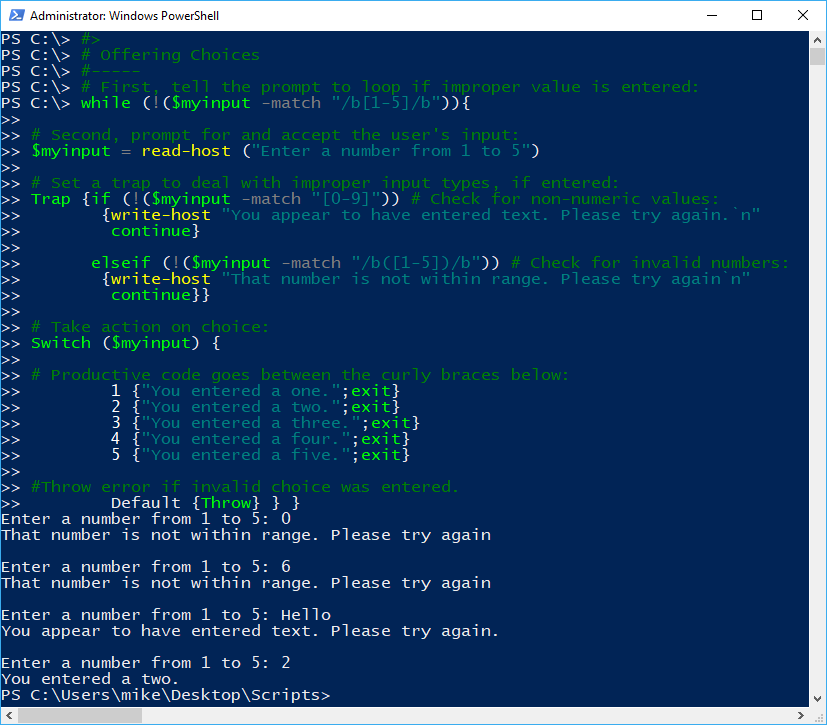
# Offering Choices
#-----
# First, tell the prompt to loop if the improper value is entered:
while (!($myinput -match "/b[1-5]/b")){
# Second, prompt for and accept the user's input:
$myinput = read-host ("Enter a number from 1 to 5")
# Set a trap to deal with improper input types if entered:
Trap {if (!($myinput -match "[0-9]")) # Check for non-numeric values:
{write-host "You appear to have entered text. Please try again.`n"
continue}
elseif (!($myinput -match "/b([1-5])/b")) # Check for invalid numbers:
{write-host "That number is not within range. Please try again'n"
continue}}
# Take action on choice:
Switch ($myinput) {
# Productive code goes between the curly braces below:
-
{"You entered a one." ;exit}
-
{"You entered a two." ;exit}
-
{"You entered a three." ;exit}
-
{"You entered a four." ;exit}
-
{"You entered a five." ;exit}
#Throw error if invalid choice was entered.
Default {Throw} } }
# END
NOTE: You may have noticed already that there are two ways to paste copied code into the CLI. If you right-click the CLI, the code will paste itself in and run automatically. However, that's not always what we prefer.
If you left-click the CLI prompt line and then press CTRL-V, the entire selection of copied code will be passed (as you see below) into the CLI buffer, where you can scroll through it before pressing ENTER to execute it. Notice the CLI continuation prompts.
So far, we've been dealing with Read-Host. You can see the issues. We're at the mercy of what is typed in and must accept or prevent errors. However, another technique for handling the input. .NET classes are available within PowerShell, and many are very easily exploited.
True, some of the display-related .NET classes, while helpful, have certain limitations of which the scripter must remain aware.
For instance, some [CONSOLE] members are valid only on the Command Line Interface (CLI) screen and not in the ISE. That means that while we can write our code in the ISE, certain portions must be tested in the CLI instead. These mainly involve cursor positions and sizes, window width and height. Likewise, specific [ESC] sequences work only in the CLI, such as making your line of text begin at the left margin, and overwriting whatever might already be there.
Most importantly, for our menu project,: the ReadKey() method cannot be used in the ISE, and that's what we must use to have a single keypress involved in our choice-making process. These CLI-only capabilities allow scripters to display multiple-choice menus.
Fortunately, while we develop our scripts in the ISE, we seldom use the ISE in production. That is to say; our scripts end up being executed elsewhere. With this in mind, let's have a look next at moving to a more menu-like display in the CLI. Read the code and comments below, and then try the code in your own CLI if you like.
SAMPLE CODE:
# Menu for CLI (Save this excerpt in a new script file and run it in the CLI.)
# We usually clear the screen before displaying menus.
cls
# These next three linefeeds [ESC] sequences move us down from the top.
"`n`n`n"
<# Now, we need to position our choices in columns on the screen. Again, we'll use -f formatting. Note that column numbers begin with 1, but spacing from the left begins with 0. In this example, 40 columns are reserved for our list's first item (index 0).
The second item (index 1) requires no extra spaces and thus begins at column 41. Once we start framing our menu later, we'll notice the off-by-one issue this causes. The "'t" is the TAB [ESC] character, giving us a little left-margin space.#>
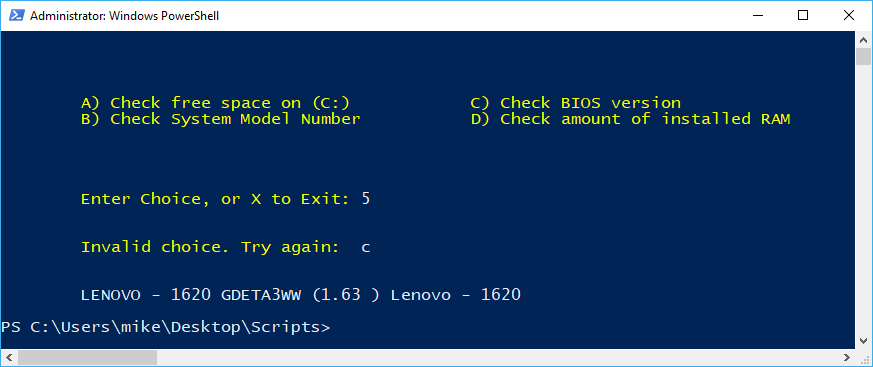
Write-Host ("{0,-40}{1,-0}" -f"`tA) Check free space on (C:)", "C) Check BIOS version") -ForegroundColor Yellow
Write-Host ("{0,-40}{1,-0}" -f" `tB) Check System Model Number", "D) Check amount of installed RAM") -ForegroundColor Yellow
# These next three linefeeds (new line) [ESC] sequences move us down a bit from the menu.
"`n`n`n"
# Next, we ask the user to choose a menu item:
Write-Host" `tEnter Choice, or X to Exit:" -ForegroundColor Yellow -NoNewline
# As in our previous example, we'll use a WHILE loop, but we'll expect a single character this time.
while ($true) {
# Notice that the input opportunity comes within the WHILE loop. One advantage
# of using the ReadKey() method is that it moves forward after a single key press. The
# ReadKey() method stores the single keypress character in its key property.
$choice = (([console]::ReadKey()).key)
# Some more line spacing for readability and appearance:
"`n'n"
# As in our previous example, we'll use a SWITCH construct to evaluate the input.
# In this case, I've used some universally available real-world code for illustration.
# Notice that the character being compared matches our two-column menu created above.
Switch ($choice) {
"A" {"`r't$ ([math]::round((get-volume c).SizeRemaining /1gb, 2)) GB'n";exit}
"B" {"`r`t$((Get-WmiObject win32_computersystem)|
foreach{$_.Manufacturer+"--"+$_.model})`n";exit}
"C" {"`r`t$((Get-WmiObject win32_bios).biosversion) `n";exit}
"D" {"`r`t$((Get-WmiObject Win32_physicalmemory).capacity / 1gb) GB`n";exit}
"X" {"`r'tBye! `n'n";exit}
Default {Write-Host"`tInvalid choice. Try again:" `
-ForegroundColor Yellow -NoNewline}
}
}
# END
So now we have our functioning menu. It lacks only a bit of decoration. Creating ANSI-like graphics in the CLI can be tedious, but what the heck? We have time!
To use the native graphic characters provided by ASCII and Unicode encoding, we must hold down the ALT key while entering the character's code on the number keypad and then let go. The resulting character will appear at our cursor position.
For a demo, try placing a # character on your screen with ALT+177. Did it work? This is how we will get the characters to decorate our screen. We'll place them in variables, so we can use them without creating them from scratch each time. (These characters can be displayed in the ISE, but their screen positioning can't.)
Visit here to view a complete list of all the ASCII codes.
Decorating Our Menu Display:
First, we visit the above URL and select the characters we want to use. I've selected these:
ALT 185 = +
ALT 186 = |
ALT 187 = +
ALT 188 = +
ALT 200 = +
ALT 201 = +
ALT 202 = +
ALT 203 = +
ALT 204 = +
ALT 205 = -
ALT 206 = +
ALT 32 = <SPACEBAR>
-----
Just for practice, try drawing a little box, line by line, by using the above ALT codes:
+---+
| |
+---+
That ALT code sequence is:
201,205,205,205,187
186, 32, 32, 32,186
200,205,205,205,188
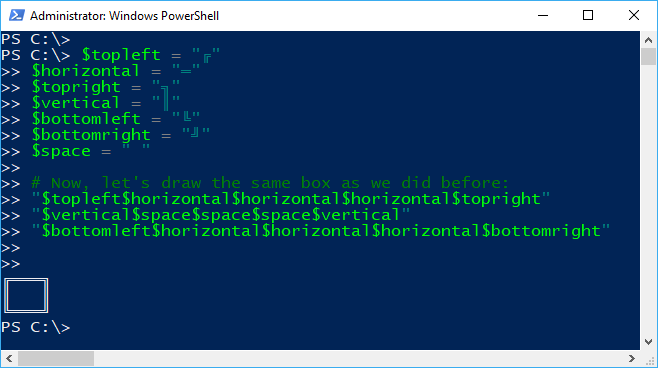
Storing the characters in variables is much easier:
$topleft = ALT 201
$horizontal = ALT 205
$topright = ALT 187
$vertical = ALT 186
$bottomleft = ALT 200
$bottomright = ALT 188
$space = ALT 32
That's what we'll do in the following routines.
SAMPLE CODE:
# First, we'll load the variables as strings:
$topleft = "+"
$horizontal = "-"
$topright = "+"
$vertical = "|"
$bottomleft = "+"
$bottomright = "+"
$space = " "
# Now, let's draw the same box as we did before:
"$topleft$horizontal$horizontal$horizontal$topright"
"$vertical$space$space$space$vertical"
"$bottomleft$horizontal$horizontal$horizontal$bottomright"
# Test that code out. It should produce the same little box.
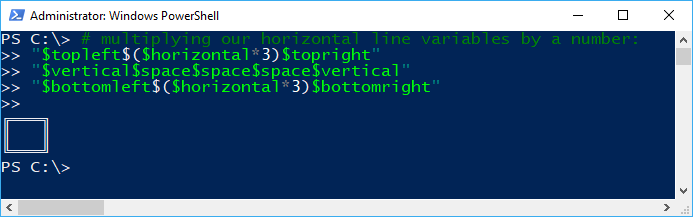
# Next, let's implement some text manipulation techniques by
# multiplying our horizontal line variables by a number:
"$topleft$($horizontal*3)$topright"
"$vertical$space$space$space$vertical"
"$bottomleft$($horizontal*3)$bottomright"
# Test that code out. You should see the box again.
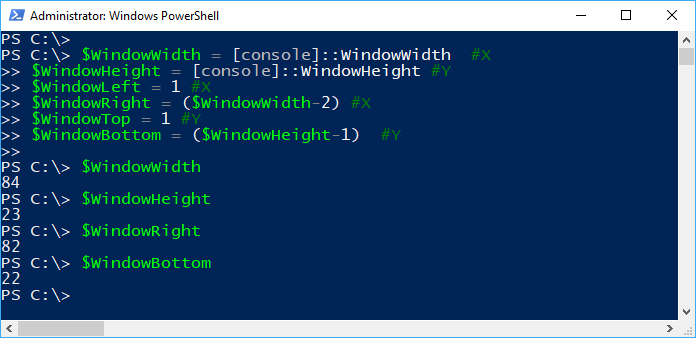
# Now, let's try out some screen positioning:
# Note: Remember, you can only test these in the CLI.
# Because the CLI's prompt gets in the way, it's best to
# save the script and then execute the script manually.
# Here, we retrieve and store our coordinates in variables.
$WindowWidth = [console]::WindowWidth #X
$WindowHeight = [console]::WindowHeight #Y
$WindowLeft = 1 #X
$WindowRight = ($WindowWidth-2) #X
$WindowTop = 1 #Y
$WindowBottom = ($WindowHeight-1) #Y
# Tidy up the screen before drawing the box:
cls
# Draw our box:
Write-Host "`r$topleft$($horizontal*$WindowRight)$topright" -NoNewline;
for ($y=$WindowTop;$y -lt $WindowBottom-10;$y++) {
[console]::SetCursorPosition($WindowLeft-1,$y);Write-Host "$vertical"};
for ($y=$WindowTop;$y -lt $WindowBottom-10;$y++) {
[console]::SetCursorPosition($WindowRight+1,$y);Write-Host "$vertical"};
Write-Host "`r$bottomleft$($horizontal*$WindowRight)$bottomright" -NoNewline;
# END
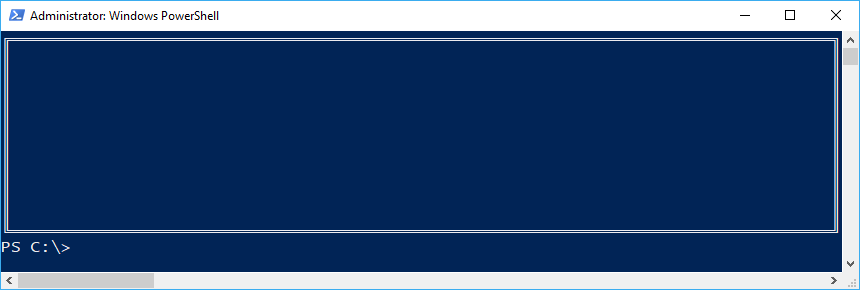
By this point, as you see above, we've drawn a frame for our menu. Note that you could change the bottom line location of the frame to suit your preferred size by changing the number of lines subtracted from the $WindowBottom variable in the two FOR loops. You could even pass the desired size as a command line parameter if you like. I'll do that in our finished script.
Next, we need to work on positioning menu text inside the frame. I selected the four WMI commands we saw and used above for this demo. Of course, you may substitute your favorites, but you'll have to be sure that the results don't overwrite our colorful frame, at least for the time being. I'll show you how to overcome that issue later in this post.
As it turns out since we previously positioned our menu text by using the -f format operator, the code we used then won't work now. It will overwrite our borders. So instead, we'll position our cursor at an appropriate starting place for each menu option and then write the text starting there.
We'll do this using [console] .NET class's methods.
SAMPLE CODE:
# Display menu text in specific locations:
# (Use CTRL-C and CTRL-V to paste this code into the CLI to test it.)
cls
[console]::SetCursorPosition(10,10);
Write-Host ("[A] Check free space on C:") -NoNewline
[console]::SetCursorPosition(40,10);
Write-Host ("[B] Check System Model Number")
[console]::SetCursorPosition(10,12);
Write-Host ("[C] Check BIOS version") -NoNewline
[console]::SetCursorPosition(40,12);
Write-Host ("[D] Check Installed RAM`n")
# END
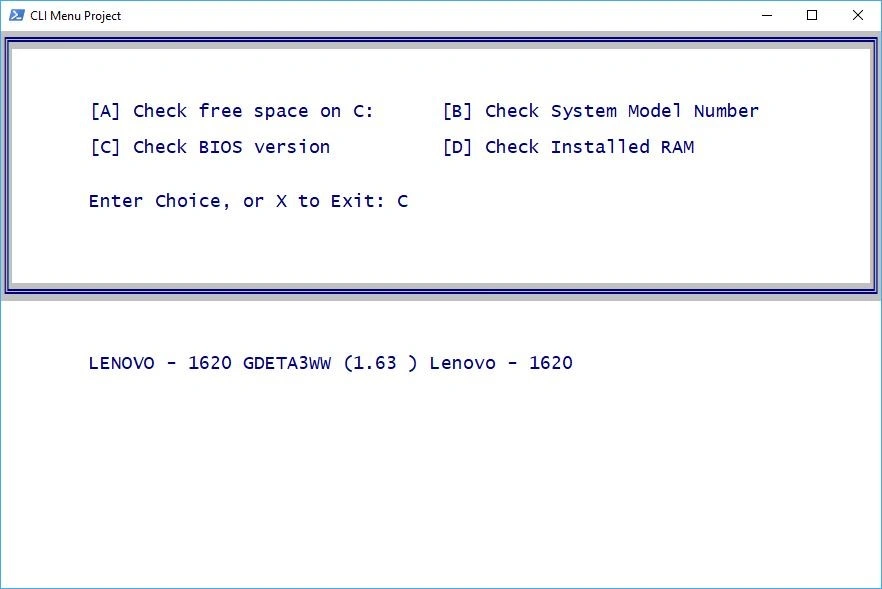
We verify below that the code places choices in good positions:

At this point, you've experienced the concepts and techniques you need. What follows is documented code that should be reasonably intuitive for experienced scripters. I've added a parameter to select a menu size and played with colors a bit to improve the cosmetics. You'll see that I've documented those trivial tweaks.
The goal below is to use our discussion to produce a simple CLI menu.
# Complete demo script starts here:
# Project name: Framed Menu Selection Box Demo
# Accept optional parameter. Default to "Small" frame:
param ($FrameSize = "Small")
# Param statement must come first.
# Quit if running is ISE:
if ($psISE){"`nThis script cannot run in the ISE." ;exit}
# Save original values, then set console colors:
$origback = [console]::BackgroundColor
$origfore = [console]::ForegroundColor
[console]::BackgroundColor = "White"
[console]::ForegroundColor = "DarkBlue"
# Save the original CLI Window title, then set a custom title:
$origtitle = [console]::Title
$wt = "CLI Menu Project" # Modify this value to change title.
[console]::Title = $wt
# Adjust these values to control Window size.
$height = 30; $width = 80
# Adjust menu text positions based on frame size:
# (You can adjust these values to suit your needs.)
switch ($FrameSize){
"Small"{$bm=($height/2);$tm=4}
"Large"{$bm=($height/3);$tm=6} }
<# Abbreviation Legend: (This helps keep variable names short.)
tl = top left corner
tr = top right corner
bl = bottom left corner
br = bottom right corner
h = horizontal line
v = vertical line
ft = frame top
fb = frame bottom
bm = bottom margin
ww = window width
wh = window height
bw = buffer width
bh = buffer height
x = cursor column position
y = cursor line position
ln = line number
wt = window title
fc = foreground color
bc = background color
#>
# Tidy up
cls
# Select a frame and menu colors:
$fc = "DarkBlue"
$bc = "Gray"
# Note: Below, we must set the height values before the width values.
# Failing to do so will result in mismeasurements caused by scrollbars.
[console]::WindowHeight=$height;[console]::BufferHeight=$height
[console]::WindowWidth=$width; [console]::BufferWidth=$width
#Keep menu on screen by looping until X is pressed:
While ($true) {
# First, we'll load the variables as strings:
$tl = "+";$h = "-";$tr = "+"
$bl = "+";$v = "|";$br = "+"
$spc = " "
# Now, let's try out some screen positioning:
# Note: Remember, you can only test this in the CLI.
# Window and frame coordinates:
$ww = [console]::WindowWidth #X
$wh = [console]::WindowHeight #Y
$wl = 1 #X
$wr = ($ww-2) #X
$wt = 1 #Y
$wb = ($wh-1) #Y
# Position coordinates:
$x1 = 8 # Column 1 from left
$x2 = 40 # Column 2 from left
$y1 = $tm # Row 1 from top
$y2 = $tm+2 # Row 2 from top
$yQ = $y2+3 # Row for our question
# Now, we draw our box with a function we'll call later:
function show-box {
Write-Host "`r$tl$($h*$wr)$tr" `
-ForegroundColor $fc -BackgroundColor $bc -NoNewline;
$global:ft = ($host.ui.RawUI.CursorPosition).Y;
for ($y=$wt;$y -lt $wb-$bm;$y++) {
[console]::SetCursorPosition($wl-1,$y);
Write-Host "$v" -ForegroundColor $fc -BackgroundColor $bc};
for ($y=$wt;$y -lt $wb-$bm;$y++) {
[console]::SetCursorPosition($wr+1,$y);
Write-Host "$v" -ForegroundColor $fc -BackgroundColor $bc};
Write-Host "`r$bl$($h*$wr)$br" -ForegroundColor $fc -BackgroundColor $bc `
-NoNewline ;
$global:fb = ($host.ui.RawUI.CursorPosition).Y;
}
# End of box function
# Next, we'll use another function to call later to place our menu inside the box:
function show-menu {
[console]::SetCursorPosition($x1,$y1);
Write-Host ("[A] Check free space on C:") -NoNewline
[console]::SetCursorPosition($x2,$y1);
Write-Host ("[B] Check System Model Number")
[console]::SetCursorPosition($x1,$y2);
Write-Host ("[C] Check BIOS version") -NoNewline
[console]::SetCursorPosition($x2,$y2);
Write-Host ("[D] Check Installed RAM")
# Start menu loop: (Once we have the menu on the screen, we have some
# further requirements to accommodate the involved I/O:
while ($true) {
# Present the prompt inside the box:
[console]::SetCursorPosition($x1,$yQ);
Write-Host "Enter Choice, or X to Exit:" -NoNewline;
[console]::CursorVisible = $False
$choice =(([console]::ReadKey()).key)
# Ensure that with each subsequent choice, the results area is clean:
for ($ln=$global:fb+1;$ln -le $global:fb+3;$ln++){
[console]::SetCursorPosition(0,$ln);[console]::WriteLine(" "*$ww)}
# Evaluate input and take appropriate action:
Switch ($choice) {
"A" {"`r`t$([math]::round((get-volume c).SizeRemaining /1gb, 2)) GB $(" "*70)"}
"B" {"`r`t$((Get-WmiObject win32_computersystem)|
foreach{$_.Manufacturer+"--"+$_.model}) $(" "*70)"}
"C" {"`r`t$((Get-WmiObject win32_bios).biosversion) $(" "*70)"}
"D" {"`r`t$((Get-WmiObject Win32_physicalmemory).capacity/1gb) GB $(" "*70)"}
"X" {[console]::ForegroundColor = $origfore; [console]::BackgroundColor = $origback;
[console]::CursorVisible = $True;cls;[console]::Title="";
[console]::Title = $origtitle; exit}
Default {[console]::SetCursorPosition(0,$global:fb+2);
for ($ln=$global:fb+2;$ln -le $global:fb+3;$ln++){
[console]::SetCursorPosition(0,$ln);[console]::WriteLine(" "*$ww)}
Write-Host"` r'tInvalid choice. Try again...$(" "*70)" -NoNewline}
} # End of Switch
} # End of menu function
} # End of Menu loop.
# At last, we can run our two functions:
show-box
show-menu
}
# End of Script loop.
# END of Script
Here's a screenshot of the finished menu:
Just another word or two before summing up...
As I mentioned, you may need to produce more than a line or two of output. This could cause our menu to scroll off the screen or parts of the output to overwrite our menu or frame. To avoid that, we execute the involved menu choice code such that it produces a second titled window displaying the results.
If the code is complicated, we might want to build it into a function that our keypress code would launch when the selection is made. Below is an example. In this case, pressing E would evoke ServiceList.
Here's an alternative menu item that launches a separate window:
SAMPLE CODE:
function ServiceList {
start-process PowerShell "-noexit &{[console]::title = 'Services';
get-service;'`nEnter ''EXIT'' to close this window.'}"
}
# END
Summary:
In this post, we've explored a few core techniques for creating task-specific menus to be displayed in customized windows.
We've seen how to...
- Use graphics and colors to create frames and borders;
- Retrieve, store, and use CLI screen (X,Y) coordinates;
- Move to a specific row and column before displaying text;
- Read single keypress values with ReadKey();
- Execute code and functions based on a menu choice;
- Keep our screen clean and maintain our custom text positioning;
- Require specific keypresses to proceed.
- Use several .NET classes and their members
- Create and call functions for common routines
I hope you've had as much fun reading and learning from this project as I had producing it. You might like to try tweaking the code we've explored to make it more useful in your daily routines.
Meanwhile, happy scripting!
--Mike
PowerShell Console FAQ
Q: What is PowerShell Write to Console?
A: PowerShell Write to Console refers to the cmdlets used to display output in the console window. These include Write-Host, Write-Output, and Write-Verbose, among others.
Q: What is PowerShell Wait for Keypress?
A: PowerShell Wait for Keypress refers to the use of the ReadKey() method in .NET classes to accept single keypress input from a user. This is useful for creating menus or other interactive scripts.
Q: What is PowerShell WriteHost?
A: PowerShell WriteHost is a cmdlet used to display output in the console window. It is similar to the other Write commands, but it is specifically designed for output that requires custom formatting or color.
Q: Can I create multiple-choice menus in PowerShell console?
A: Yes, it is possible to create multiple-choice menus in the PowerShell console using PowerShell commands and .NET classes. In the blog post, the author walks through the process of creating such menus step by step.
Q: How do I prevent errors when using Read-Host for choice-making?
A: To prevent errors when using Read-Host for choice-making, you would need to add coding to ensure that the value entered meets your expectations. This can be done using regular expressions (RegEx).
Q: What are some limitations of using .NET classes in PowerShell?
A: Some .NET classes have limitations when used in PowerShell, such as certain [CONSOLE] members being valid only on the CLI screen and not in the ISE. The ReadKey() method, which is used for accepting single keypress input, cannot be used in the ISE.
Q: How can I use graphics and colors to create frames and borders in PowerShell console?
A: You can use native graphic characters provided by ASCII and Unicode encoding to create frames and borders in PowerShell console. To do this, you would hold down the ALT key while entering the character's code on the number keypad and then let go. The resulting character will appear at your cursor position.
Q: Can I customize the size and appearance of the menu in PowerShell console?
A: Yes, you can customize the size and appearance of the menu in PowerShell console by changing the number of lines subtracted from the $WindowBottom variable in the FOR loops or by passing the desired size as a command line parameter.
Q: How can I maintain custom text positioning in PowerShell console?
A: To maintain custom text positioning in PowerShell console, you can use the [console] .NET class's methods to move to a specific row and column before displaying text. This will ensure that the text is displayed in the correct position on the screen.
Q: Is it possible to execute code and functions based on a menu choice in PowerShell console?
A: Yes, it is possible to execute code and functions based on a menu choice in PowerShell console. In the blog post, the author provides examples of how to do this using keypress code and functions that are launched when a menu selection is made.
Explore our catalog of PowerShell and Windows Server training,
This piece was originally posted June 02, 2019 and has been reposted with an updated faq.